
Rustic Ravioli with Pumpkin, Spinach and Portabella Mushroom Filing

Rustic Ravioli with Pumpkin, Spinach and Portabella Mushroom Filing
Handmade with no Fancy Tools
By Chef Donna Valente
Tools Needed:
Large flat rolling surface
Rolling Pin
Pizza cutter
Small sharp knife
Chopping knife
Round biscuit cutter
Mixing bowl
Small bowl
Large frying pan
Spatula
Pastry brush
Small ice cream scoop (or 2 tablespoons)
Large pot
Colander
Large slotted spoon
Ingredients:
Pasta
2 cups + 1 tablespoon unbleached all-purpose flour = 9 ounces (255 grams)
3 large eggs
1 tablespoon extra virgin olive oil
1 teaspoon salt
Filling
8 ounces baby portabella mushrooms
3 cloves fresh garlic
1 cup pumpkin puree
1/2 pound fresh spinach
1 tablespoon olive oil
1 tablespoon nutritional yeast
1 teaspoon salt
1 teaspoon freshly cracked black pepper
1 teaspoon paprika
1 teaspoon celery seed
Ravioli
Water (approximately 10 cups)
1 tablespoon salt
1 tablespoon olive oil
Grated nondairy Parmesan cheese
Directions:
Pasta
Spoon 2 cups and 1 Tablespoon of flour and 1 teaspoon of salt into a mixing bowl and mix together.
Smooth the flour and then create a bowl-shaped impression in the center of the flour.
Crack the 3 large eggs into the flour bowl.
Add 1 Tablespoon of olive oil to the bowl.
Mix with a large wooden spoon or your clean hands until a dough forms. It will be very sticky and difficult to work with at first but keep mixing it and it will come together.
Roll the dough around the inside of the bowl to incorporate all of the dough on the sides of the bowl. Form into a ball and then flatten to a circle.
On a lightly floured surface, kneed the dough by folding the circle in half and pressing into the dough with the bottom of the palms of your hands. Then turn it around and repeat on the opposite side. Kneed for 5 minutes.
Cut dough into 2 equal sized pieces and then set dough in a bowl and cover with a clean towel.
Set aside to rest while you make your filling.


Filling
Prepare mushrooms by rinsing, patting dry, cutting off stems, and chopping. Set aside.
Prepare 3 cloves of garlic by removing the peel with a small sharp knife, trimming the ends and chopping fine or mincing with a garlic press. Set garlic aside.
Wash spinach, pat dry and trim. Set aside.
Heat a large frying pan on medium and when hot, add 1 Tablespoon of olive oil and then the minced garlic. Sauté garlic until just golden (no more than 2 minutes). Sauté means to use a hot pan and small amount of oil to cook food quickly, which browns the food and adds complexity to aromas and flavors.
Add chopped mushrooms to the garlic and sauté.
Add 1 teaspoon of salt, 1 teaspoon of black pepper, 1 teaspoon of paprika and mix into the vegetables.
When mushrooms are soft, add the 1 cup of pumpkin puree and mix.
Immediately add the spinach.
Add 1 Tablespoon of nutritional yeast and 1 teaspoon of celery seed and mix.
Continue to sauté until spinach is cooked down and mixture is evenly distributed.
Remove pan from heat and set aside.
Making the Ravioli
On a clean flat surface, use a rolling pin to roll both pieces of dough into rectangular sheets that are the same size. This takes time, muscle and patience! It doesn’t need to be perfect or pretty.
Set one dough sheet aside.
Using a small cookie scoop, place small scoops of filling on the dough in rows, leaving space around each scoop. If you don’t have a cookie scoop, use two spoons instead. Scoop with one and scrape the mixture off with the other. Make 2 rows of 4 or 5 each. You want at least a half inch of dough around each scoop of filling, so ravioli scoops should be at least an inch apart.
When rows are finished, use a pastry brush dipped in mushroom broth (or water) to moisten the dough surrounding each scoop.
Gently place the second sheet of dough over the first like a blanket. Carefully and gently press the dough over each scoop to remove gaps. Lightly press the dough perimeter (outside edges) of each ravioli to seal them up.
To cut the ravioli, you can use a round biscuit cutter that is wide enough to contain the scoop and dough perimeter. Or you can cut square ravioli using a pizza cutter, which will likely allow you to waste less dough.
Gently press the edges again of each piece of ravioli to seal it up. This makes sure that the filling doesn’t fall out while cooking the ravioli.
Cooking the Ravioli
Fill a large pot half way with water and bring to boil.
Add salt.
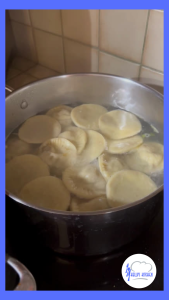
Add ravioli and cook, stirring very gently, until the water returns to a boil and the ravioli float to the top of the water in the pot. This usually takes 6-8 minutes. When they start to float, that is when they are done.
Using a large slotted spoon, remove each ravioli and let water drain off.
Then place in a large flat bowl or plate.
Alternatively, you could empty the ravioli and water into a colander in the sink to drain. Since the ravioli are fragile, I recommend removing them individually and then plating.
Drizzle ravioli with olive oil and then sprinkle with salt and pepper and dairy free grated Parmesan cheese if desired. Or, serve with your favorite sauce. I served this ravioli with my own Italian gravy and grated dairy-free Parmesan and it was delish.
Enjoy!


Notes on my first attempt at making pasta from scratch:
Homemade ravioli making is an endeavor of love, time, and patience. Ravioli is extremely gratifying to make at home without any fancy tools, and can be filled with whatever you wish, so go ahead and unleash your creativity!
I learned how to make the ravioli dough and cook the ravioli from www.goodfoodstories.com. The ravioli filling is my own creation.
Happy Cooking and Happy Eating!